Deactivating Sleep Mode On Mac
by 17/12/2020 16:550

There is not one single Mac user in the world that would say no to more battery life. Even though all the latest Mac models tend to give about 11 to 12 hours worth of battery life. However, that doesn’t change the fact that the more you use your computer or the more external devices you have connected to it; eg. using a usb c hub with hdmi, then the more likely your battery’s health and capacity will continue to decrease. Once this happens, you will inevitably have to keep charging your computer more and more often. The good news is that there are several excellent third-party applications that you can use to help improve your battery performance and hopefully extend it’s capacity as long as possible. One of them is Sleep Mode, so we’re going to deep dive into what that is, how you can use it and how it helps you better manage your Mac’s battery health.

What Does Sleep Mode Do?
If you are unfamiliar with this mode, it’s actually something that happens on your Mac every single day. Let us explain. Usually, whenever you aren’t using your computer for more than a few minutes, your MacBook will start to dim it’s display and keyboard lighting. In some cases, your screensaver may come on screen instead and it will stay active for a few minutes until your Mac screen completely goes black. That is what is defined as Sleep Mode.
The process essentially ceases any visible activity on your computer but in the background any important functions are kept running. For example, when this mode is active, your MacBook will usually still keeps the Mail app working in the background. It is a very useful feature because if you were to press any button or flip open the lid, your Mac will simply spring to life instantly with no need to restart or load anything, allowing you to quickly pick up where you left off. Another added benefit, is that it helps you conserve battery life, if you aren’t using your MacBook. However, the problem with Sleep Mode is that it can sometimes interfere with your work, as the auto-locking feature can prove to be interrupting whenever you are working on another monitor, for example. This raises the question, how can you keep your MacBook awake?
Using Energy Saver
The benefit of sleep mode being a native feature on every MacBook is that users can control how and when it is active on your device. You can easily do this by heading to System Preferences and clicking on the Energy Saver section. In there, you will find two operate functions: Battery and Power Adapter. From there you should be able to adjust your sleep mode settings very easily by ticking and unticking either; putting your hard disks to sleep, dimming the display, enabling power nap etc. However, do keep in mind that if you prefer to focus on battery preservation then you should tick all the boxes.
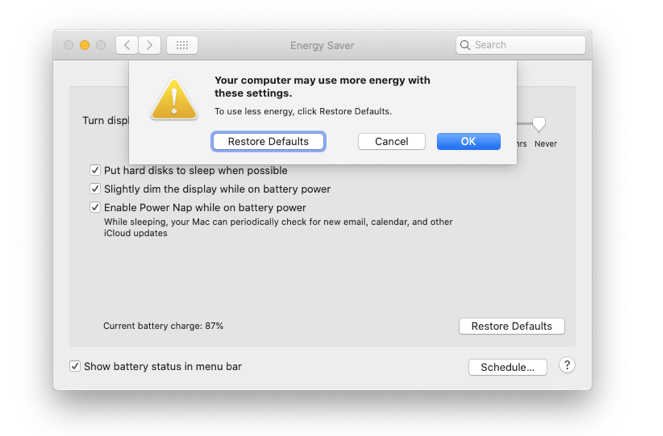
However, do keep in mind that if you prefer to focus on battery preservation then you should tick all the boxes. For those who dislike the fact that sleep mode keeps on dimming their Mac displays, you can always turn this off or delay it, by heading to the Battery and Power sections and adjust the slider to match the timeframe you prefer. So, if you prefer your Mac dimming after an extended period, you can shift it from eg. 2 minutes to 10 minutes or even 1 hour.
How To Adjust Sleep TimeFrame
You may now be familiar with how to keep your screen and display from dimming and being an inconvenience,. However, if you only intend to simply adjust the screen saving feature for specific periods, while still keeping your Mac in energy saving mode for the rest of the time, then using this method above may prove to be quite tedious. This is because you will have to keep going back and adjusting the settings each time. In such situations, utilising a third-party app like Lungo, will prove to be the better choice. This utility app is very useful in helping you easily adjust your Mac’s sleep time. You can quite easily change how long you wish to keep the Mac active eg. 10 minutes or 5 hours, then deactivate the app when you are finished working. This means you don’t have to adjust any Energy Saver settings at all!
However, doing this will obviously start to consume more of your battery life and you will need an application that can help you manage your battery consumption in the process. Another useful app that can help you manage this is Endurance, which can automatically improve your MacBook’s battery health by up to 20% on each battery cycle. It accomplishes this by altering a few non-vital functions on your Mac such as dimming keyboard lighting, minimising background applications and programs etc. It is basically like the energy saver on your iPhone, that you turn on once your battery life gets to a certain point to help it last longer. On a side note, when you are done working, you should aways pack your Mac safely in a macbook leather sleeve, as it helps better keep your hardware safe
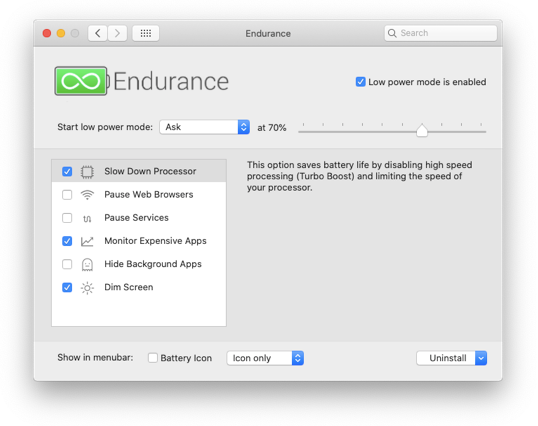 and protected, at all times.
In summary, this article should have helped you better understand your Mac’s energy saving system and how you can manage it efficiently so that it doesn’t hinder your work in the process. From utilizing the Energy Saver on your Mac, to downloading battery optimisation applications like Lungo, there is an endless number of ways available to you, so do make sure to use these suggestions to improve your work life and most importantly, your battery’s health.
Related posts

Technology / by - ago
Dr Melvin Rabin: How Artificial Intelligence Is Transforming Modern Medicine
Dr Melvin Rabin is a retired clinical psychologist who spent nearly five decades treating patients at his practice in Needham, Massachusetts. At Rabin Associates, he addressed a wide range of…

Technology / by - ago
Yamaha R15: The Perfect Entry-Level Supersport for Indian Riders
Choosing a first supersport motorcycle can be hard for many riders. New riders usually look for a bike that looks sporty, has modern technology, and is easy to handle. The…

Technology / by - ago
How to Upgrade Your Front Porch to a Cosy Retreat
Your front porch is the first impression of your home, yet it is often overlooked as a space that can be both functional and inviting. With a few thoughtful upgrades,…

Technology / by - ago
Behind The Security Curtain: How QQWIN4D Ensures Safe Transactions Every Single Time
Do you want to know how QQWIN4D keeps each transaction safe in a simple and steady way? Many users think about this before they add funds, check account details, or…